Saturday, August 26, 2017

How to Get Rid of Cellulite

Although the vast majority of woman have some cellulite somewhere on their body – nobody likes it!   So what the heck is cellulite anyway?  Cellulite is pockets of fat that have squeezed between bands of tissue, called septae, that are located below your skin.

Women of all races get it, while virtually no men do. That's because the septae of men are different from women. Men have stronger bands that are cross-hatched allowing them to keep fat in place more effectively. Women have weaker, vertically oriented septae that allows fat to squeeze through easier.

Both thin and heavy women have cellulite. However the higher your level of body fat the more noticeable the dimpling will tend to be.  Unfortunately dieting does necessarily help eliminate cellulite. Losing weight helps sometime, but in some cases weight loss makes cellulite worse.   This occurs when skin becomes saggy after significant weight loss.

There is a definite genetic component to cellulite which does run in families.
Hormones also are part of the equation with cellulite, but science has not figured out exactly how hormones contribute to cellulite.  What is known is that cellulite starts at puberty which is a time that many hormone levels change significantly in females.

Getting Rid of Cellulite

Getting rid of cellulite is easier said than done.  Even treatments like Liposuction are not necessarily effective.    In fact Liposuction often makes cellulite worse by leaving your skin even more puckered looking than it was before.

Dermatologists are quick to point out that there is no magic cure for cellulite, but there are ways to make it look better!   Two of the keys are working out and dropping excess weight sensibly (1lbs per week! – faster weight loss can exacerbate the problem!)

Resistance training is key.   As you increase your muscle size and decrease body fat your skin looks smoother.     If you lose fat while you simultaneously build muscle your cellulite will improve.
It is also important to work on the health of your skin as you age to make it more elastic so that as you lose fat the skin pulls tight rather than sagging.    

Certain topical treatments that increase collagen in the skin, like Retin-A or creams with retinol or vitamin C, cannot hurt and may help.   

Maintaining adequate water intake is also key for skin health and elasticity – 6 – 8 glasses of water per day is key.

If you have faithfully tried everything and your cellulite is driving you crazy and you are prepared to spend some serious dollars – Cellulaze – is an FDA approved therapy.  Cellulaze involves inserting a lazer under the skin and projects heats in three directions and literally liquefies fat as it cuts the septae around fat cells which can reduce the puckering while also encouraging collagen regrowth.

Cellulaze claims a 70 – 80% improvement in cellulite that lasts a full year.  It is most effective for active women with mild to moderate cellulite who are not significantly overweight and who also have good muscle tone.


Unfortunately, Cellulaze is not cheap – costing $5,000 - $7,000 depending on the size of the area being treated.

Sunday, August 20, 2017

How Much Protein Do You Need Each Day?


One of the most controversial and confusing aspects of nutrition is how much protein people should consume each day.    There are several factors to take into account to get a good answer to this question, and there are potential problems with eating too much protein.   There are also definitely problems with not eating enough protein.  It is also important to consider what type of protein is being consumed.

Height, weight, age, sex and activity level all factor into your protein needs.   Obviously the larger you are the more protein you need to take in to support structural proteins throughout the tissues of the body including the muscles, bone, skin and organs.  In the same way the more active you are the more protein you need to consume.  In addition, protein is used to create enzymes, and enzymes are critically important for all cellular function.

Protein is made up of amino acids and there are essential and non-essential amino acids.    Essential amino acids MUST be consumed because they cannot be made by the body.    Complete proteins contain all the amino acids and come from meats, poultry, fish, eggs and dairy.   While vegetarian proteins are not complete it is not hard to combine different plant protein sources to obtain all the protein the body needs to function.

Other factors which influence how much protein is required is overall caloric/energy status.     If you are eating enough calories to maintain bodyweight or gain bodyweight you require less protein as a percentage of overall calorie intake while those people in caloric deficit require a higher percentage of their overall calorie intake to maintain lean tissue mass (losing lean mass like muscle is usually NOT a good idea so this is important).

How much is too much?

In large amounts and for certain populations (such as those with compromised Kidney Function) excess protein can cause problems.    That being said, for the normal healthy individual, the body can easily and safely process and use a lot of protein.    A portion of the protein you eat is frequently converted to glucose (blood sugar) and if your overall calorie intake is too high you will convert excess protein into fat like ALL unused excess calories.

Another potential problem with too much protein is that high protein intake stimulates the release of mTOR which stands for Mammalian Target of Rapamycin.    mTOR is a key regulatory protein that signals for cell growth through the creation of new proteins. Consider protein building similar to a race car. The larger the engine, the greater potential for speed. Similarly, the more mTOR present in any given cell, the greater potential for more protein construction. And just like the gas pedal fuels the engine, mTOR is a signaling protein, and can be various levels of active (like a pedal’s ability to regulate speed). If a number of different processes all signal for ‘Go’, then the cell builds as much protein as it can, as quickly as it can. So just as a souped-up car takes off rapidly, a muscle cell can signal for tremendous muscle growth very quickly, given the right conditions.   n

For this reason, mTOR is a good thing when you are looking for muscle-building!  However, there is a potential dark-side to mTOR.   Cancerous tumors are designed to grow as fast as possible, and they rely on mTOR signaling to build proteins just like healthy cells.   So too much mTOR could theoretically put people at a higher risk of developing rapid and serious cancers.  In fact, a lot of cancer research is based around slowing down and minimizing mTOR activity in tumor cells (the exact opposite goal of muscle research).
 
This doesn’t necessarily mean that eating more protein for muscle building is going to cause cancer. Numerous other proteins and factors come into play, and some may respond differently in muscle cells than in cancerous cells.

Safe and Adequate Protein Intake

The Institute of Medicine's protein RDAs are calculated using 0.8 grams of protein per kilogram of body weight. This means an adult who weighs 68 kilograms needs at least 54 grams of protein each day. The RDA for pregnant and nursing women is 71 grams of protein per day.  Keep in mind the RDA is a MINIMUM and does not mean this is ideal!   This also assumes you are sedentary!   So, if you are exercising and trying to build muscle or older and trying to prevent muscle loss higher protein intake is better.  To determine your minimum daily intake, divide your body weight by 2.2 to determine your weight in Kilograms and then multiply by .8 to get your minimum daily protein intake.  

The Academy of Nutrition and Dietetics states that although athletes only need about 1 gram of protein per kilogram of bodyweight to maintain muscle mass, they require 1.4 to 1.8 grams of protein per kilogram to build muscle mass; this is equivalent to about 0.64 to 0.82 grams of protein per pound of body weight each day.


Sunday, August 13, 2017

Workout Anytime Daily 10 Prehab Routine

Everyone knows that prevention is better than dealing with an injury, and part of injury prevention is spending time working on what are commonly referred to as “corrective exercises” or “Prehab”.   10 minutes a day spent doing 10 basic exercises can prevent many injuries, improve results from exercise, and dramatically improve movement.

Ideally do these exercises barefoot or in socks – your feet will be working very hard during these exercises and shoes reduce ground feel.  If possible do them in front of a mirror to see your form!

Hip Hinge – Hip Hinging is one of basic primal movement patterns, and it is also the movement pattern most frequently done incorrectly.   The best way to groove this movement pattern is practice it using a wooden handle or PVC Pipe held vertically against your back touching the back of your head, the top of your shoulders, and your tail bone.  By keeping contact with all three points as you hinge it teaches you to maintain a flat back which is essential for preventing low back injuries and developing proper movement mechanics that allow you to effectively load and unload the glutes and hamstrings.

It is also a phenomenal dynamic warm-up for the hamstrings!   Here is a video showing how to do it:  https://www.youtube.com/watch?v=PG67O49Hsso    Do 50 reps per day and you will see and feel positive changes in your posture, movement, strength and mobility!

Downhill Skier Exercise – This exercise contains elements of the squat and hip hinge.  Start by placing the hands palm down on the top of the thighs.  Keep the back straight slide the hands down until the palms are resting on the knees with the hips back like you are a second basemen.   You should begin to feel a stretch in the hamstrings.     Continue to hinge from the hip forward and slide down until your elbow are resting on the inside of the knees with back straight and hips back like you are a downhill skier.  This will require your knees to track forward over and maybe even slightly beyond your toes (this will generate a stretch in the calf muscles and specifically the single joint soleus muscle).    Keep your heels down the whole time – do not let them lift up off the floor!
Keeping the back totally straight extend the knees as far as possible – you should feel a strong stretch in the hamstrings.  Your hips will rise but keep your elbows on the knees and do not move the upper body!  Then drop the hips, flex the knees and let them move forward over toes as you drop back down to the downhill skier posture.

Start slow but as you get the hang of it you can move faster – as long as you maintain proper form.     Do 30 – 50 reps every day.   You will start to notice that your squat and your hip hinge movements all get easier along with improved mobility in the ankle knee and hip!   Click here for a great video of how to do this exercise properly:  https://youtu.be/nXKWtlr3rBQ

Goblet Squat – Squats are another primal movement pattern and goblet squats help emphasize the best form.   They should be done daily with a relatively light weight for a good 20 – 50 repetitions.    Keep the dumbbell, kettlebell or Sandbag held against the chest the entire time. If you have difficulty getting thighs parallel to the floor spread your feet farther apart, and also rotate out at the hips so that your feet are pointing outwards.   This can make a huge difference.   By doing this and holding a light weight against your chest you may find you can squat to a decent depth while maintaining an upright torso.  It should look like this:  http://cfitness.me.formecdn.com/2016/12/goblet-squat.jpg  

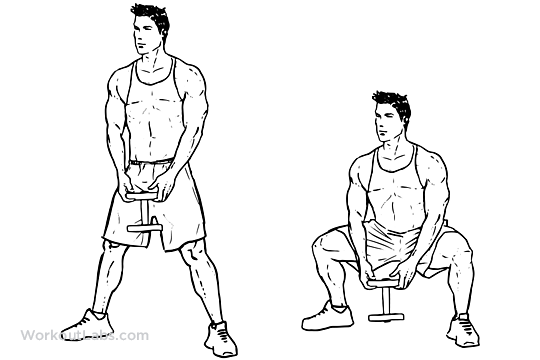
Alternatively you can hold a kettlebell/Dumbbell with both hands letting it go straight down between the legs as you squat down like this:  http://workoutlabs.com/wp-content/uploads/watermarked/Pile_Sumo_Dumbbell_Squat1.png

Single Leg RDL – Romanian Deadlift – is one of the most important corrective exercises you can do to help self-identify and correct muscle imbalances that are the most common cause of movement dysfunction and injury.

The best way to do this exercise is barefoot in front of a mirror where you can see your whole body throughout the entire sequence of the exercise.  Ideally you should be on a firm and level surface as well.

Start by facing the mirror standing on one foot with the other leg flexed so your thigh is parallel with the floor and knee flexed to 90 degrees with hands on your hips.  Look in the mirror and make sure your hips are perfectly level and if not fix that!   

Next, without moving the upper body extend the flexed leg down and hinge forward at the hip of the standing leg.   As your swing leg passes the other leg you should try to straighten it, and ideally you hinge forward at the upper body while keeping your swing leg and upper body in a straight line the whole time.

As you hinge try NOT to let your swing leg hip drop and keep your stance foot pointing directly forward with no angle.  The stance leg should flex slightly but the knee should NOT move forward – rather you should “sit” back into the hinge at the hip. Pause when you reach at or near parallel with the floor with your upper body and swing leg then smoothly return to standing and flex the swing leg.    Slower is harder AND better and do NOT use any load/weight.

10 repetitions on each side each day!   Do all 10 on each side one time per day and you will see some amazing changes in your strength, balance and athleticism! 

Here is a great single leg RDL tutorial:  https://www.youtube.com/watch?v=vc21IwnIcwk

Hip Thrusts – The hip thrust simultaneously develops the glutes while enhancing mobility in the hip flexors (both key because this counteracts the negative effects of sitting all the time!).  These can be done on the floor or with shoulders on a bench, bed or sofa to make it a bit harder.   You can do hip thrusts with two legs or one leg at a time to create additional load.   Here is a good shot of the exercise:  http://cdn-www.womenshealthsa.co.za/wp-content/uploads/2015/02/hip-thrust-hold.jpg

Important NOT to arch lower back at all and concentrate on squeezing glutes at top and NOT using low back.    Even without any load this exercise can produce great benefits – 20 – 50 reps each day!

Plank – The plank is a simple functional core exercise that produces great benefits.  It can be done on toes and hands (upper push-up position), Toes and Elbows, Hands and Knees, etc to adjust the difficulty.    Do a version of the plank that challenges for one minute per day while maintaining good form.   Here is a great article on some of the many variations:  http://www.health.com/health/gallery/0,,20813896,00.html/view-all

Side Plank – The Side Plank is also key to building core strength, but in the front plane (side to side stability and strength).   30 seconds to a minute on each side each day.   Like the plank there are many variations and one of the best when you are ready is a side plank with leg lift: https://rutheburke.files.wordpress.com/2015/05/side_bridge_abd.jpg

Static Lunge – Lunges are another primal movement pattern, and there are many different variety of lunges.  A static lunge is done with feet in a split stance like this:    https://www.google.com/imgres?imgrefurl=http://thefitnesslink.uk/exercises/static-lunge/&tbnid=J1sOV9EYH0PmVM:&docid=lgeVWz3ThLe7OM&h=1417&w=1890   

The exercise is fantastic for simultaneously developing strength and mobility in the foot, ankle, knee and hip.  Best done barefoot on a firm surface.  Keep your front heel down the entire time and rear foot is up on ball of the foot with rear knee, hip, back and head kept in alignment the entire time.    Do 10 reps at a time on each side per day – no weight is necessary. 
 
Side to Side Skater – This exercise develops hip mobility including providing an excellent dynamic stretch/warm-up for the adductor (inner thigh muscles).  Feet should be wide apart with feet facing forward – not angled out. Keep feet flat on the floor and flex forward at the hip keeping back straight (only flex forward as far as you can while maintaining a flat back and keeping both feet on the floor with entire foot kept down in contact with the ground).   Push the hips directly to the side and pause as you feel a stretch in the trailing leg’s adductors.  

Ideally your head and torso stay perpendicular to lower body and centered during the entire exercise just like a speed skater.  Then push your hips back in the other direction to the other to the other side.    NOTE:   Do NOT go up and down – your hips should go back and forth in a straight-line parallel with the floor.   Do 20 – 30 reps each day.

Ankle Circles – This exercise improves ankle mobility and is great before just about any activity.    Stand on one foot.    These can be done seated, standing or lying down – best done standing to simultaneously work on balance and stability.  The action is simple:  holding foot and leg in the air draw a circle with your toes for 10 circles in one direction and 10 circles in the other direction like this:  http://web.eccrsd.us/christy/public/athletic_training/ankle_sprain_rehab_beginner_files/Picture%201.jpg   

You will notice that one direction is much harder than the other and you will feel much less coordinated and same thing with one leg vs the other leg.  Do more repetitions in the direction that is challenging and more on the leg that is more challenging.  Ideally do the exercise while you stand on one foot while you pull your other leg up with knee bent so that your thigh is parallel with the floor.    This is more challenging than it looks but will provide big benefits in terms of balance and stability.


Done daily and before workouts these 10 exercises will provide big benefits including improved posture, stability, strength and mobility.   You will also notice that you improve at many other exercises and movements.

Sunday, August 6, 2017

Arugula - Not Just Good for Salad!

Arugula is known for as being a tangy salad green, but it is also a relative of the cruciferous family, which includes radishes, Brussels sprouts, kale, cauliflower and broccoli.   Like these foods, arugula has many highly beneficial nutrients that include anti-cancer compounds and carotenoid anti-oxidants that help eyesight.

These beneficial plant chemicals include flavonoids that improve blood vessel function, increase blood flow, lower blood pressure and lower inflammation. Arugula can also help to counteract the negative effects of heavy metals and helps eliminate pesticides from the body.

Research shows that the trace minerals and antioxidants arugula contains can block the absorption of environmental contaminants suspected of impacting your libido.

Arugula and Nitric Oxide

Arugula contains the highest levels of nitrates of any plant, and nitrates are used to produce nitric oxide (NO) in the body.    NO is a very important signaling molecule that supports healthy endothelial (blood vessal lining) function and protects the mitochondria of the cells. 
  
Arugula contains about 480 milligrams (mg) of nitrates per 100-gram serving compared to 281mg for rhubarb, cilantro at 247, and 110mg for beets.  Spinach also contains high levels as do all green leafy vegetables which is thought to be why their consumption helps prevent heart attacks, stroke and heart disease.

High Nitrate intake boosts NO directly.   NO relaxes and widens blood vessels dramatically increasing blood flow and oxygenation of your tissues.  This increases the body’s ability to carry away waste material and carbon dioxide.  A diet high in nitrates can help prevent and treat high blood pressure in this manner.

Although raw beets are the best-known vegetable for boosting NO, increasing circulation and lowering blood pressure arugula is the real king.

Nitrates, NO and Exercise Capacity and Endurance


Nitrate intake and increased NO in the body has been proven to dramatically increase exercise capacity and endurance, and the drug Viagra functions by boosting NO levels which is the drug treatment for male impotence.  So a healthier heart, lower blood pressure and increased exercise capacity are not the only reasons to increase your intake of Arugula!

Sunday, July 30, 2017

How to Optimize the Benefits of Vitamin D Supplementation

Vitamin D is constantly in the news lately and for good reason.    Optimal levels of Vitamin D have been linked to a host of benefits including prevention and treatment of many key diseases ranging from Osteoporosis to improved heart health with reduction in heart attack risk to prevention of many different types of cancer.

The ideal way to get optimal levels of Vitamin D is to let your body create it through Safe Sun Exposure (see previous blog on this subject here:  http://workoutanytime.blogspot.com/2016/08/the-facts-on-safe-sun-exposure-and.html  However this is easier said then done, and too much sun is clearly a strong risk factor for skin cancer!      Enter Vitamin D supplementation.

The amount and form of Vitamin D supplementation has changed substantially based on lots of emerging research.    The form that should be taken is Vitamin D-3 NOT D-2 form and all experts agree on this!     However when it comes to dosage things get much trickier.      The confusion comes because Vitamin D is really a powerful compound and functions as a hormone in the body.    As such it has profound impact on virtually every system in the body.    In addition you can overdose on Vitamin D supplements so more is NOT always better!

Ideally you should order a blood test and test your levels.    The test you want is called a 25(OH)D blood test and is offered by all major labs.   You can either ask your doctor to order this test for you OR you can order an in-home test.   You just prick your finger and put a drop of bloo on the enclosed paper and send back in to the labs.    You can also your own blood test online and go to a lab to have blood drawn in the same way your doctor orders the test.   For more information on testing go here:  https://www.vitamindcouncil.org/testkit/?gclid=Cj0KCQjwh_bLBRDeARIsAH4ZYEPhv0MVkO5_S7USZZ8bwVlt5A3vPWGbBFFIbJiB8Wtva0x-IDH7UmQaAlGkEALw_wcB#

Ideal versus Acceptable Blood Levels of Vitamin D

There is a big difference between what is considered “acceptable” or okay and ideal blood levels.   Here are the classifications of different blood levels of Vitamin D. according to the Vitamin D Council:
0 – 30 ng/ML is very low and considered a deficiency
30 – 39 ng/ML is better but still insufficient for optimal health and disease prevention.
40 – 100 ng/ML is optimal
Above 150 ng/ML is toxic!

The key is to test and if low take a supplement then retest 2 – 3 months after regular vitamin d use because each person is different in how much supplementation they need based on many factors including sun exposure and skin type.     The RDA for Vitamin D for infants is 400iu.    For Children 1 – 13 and adults through age 70 the RDA is 600iu and for those over 70 the RDA is 800iu.

Unfortunately, this is way too low to get many people into the sufficient much less optimal range so testing is really worthwhile.   In many cases people need 4,000 – 10,000 or more iu's per day for at least a month to get where they need to be for optimal health!

Preventing Vitamin D Toxicity through the Co-Administration of Vitamin K-2

Like many vitamins Vitamin D has a co-factor or other vitamin that helps it perform its function better and in a more balanced fashion, and that other vitamin is Vitamin K-2 (not to be confused with K-1 found in many plants).    In an ideal world, you can get all the Vitamin K-1 you need from eating plenty of green, leafy vegetables, and your body can turn it into K-2.   Unfortunately, this conversion is lacking in many people.

More importantly K-2 is not easily toxic and can be taken with Vitamin D.    K-2 is best taken as a supplement as MK-7 version which has been heavily researched and shown to improve bone health and prevent arterial calcification which can potentially occur with too much Vitamin D.     For a more complete understanding behind how K-2 works with Vitamin D and why it is a great idea to take the MK-7 form of K-2 with Vitamin D check out this article from Dr. Mercola:   http://articles.mercola.com/sites/articles/archive/2011/03/26/the-delicate-dance-between-vitamins-d-and-k.aspx


Taking 100 – 200 mcg per day of Vitamin K-2 will help optimize the effects of Vitamin D and minimize risks associated with Vitamin D Supplementation.

Monday, July 24, 2017

The Nordic Hamstring Curl: Best Hamstring Exercise You are Not Doing!

There are many different hamstring exercises including variations of leg curls (seated, prone, and standing) along with several different hip hinge exercises that target the hamstrings (RDL, Single Leg RDL, etc).     These are all great exercises, but none of them can touch the Nordic Hamstring Curl for building eccentric strength and preventing hamstring injury in sprints and sport!

This is a tough exercise so warming up the hamstrings is essential.  Using other hamstring exercises first such as bodyweight hip hinges and light leg curls on a machine prior to this exercise do the trick nicely.   It is also a good idea to do some static stretches for anterior hips and hip flexors to shut them off which helps to allow for maximum hamstring activation.

To perform the Nordic Hamstring Curl you need to find a place to hook your heels under when you are in a double leg tall kneeling position so you will also need padding under your knees.     If you have a workout partner you can have them kneel behind you and hold onto both your legs right above the ankles keeping their arm straight so they can use their bodyweight to apply load as you let your body fall forward like this:   http://willlevy.com/wp-content/uploads/2014/08/Nordic-Curl.jpg .     You can also find something to hook your ankles under like the horizontal bar from a weight machine or barbell like this:   https://i.ytimg.com/vi/f_GdZKdwovA/maxresdefault.jpg  or  this:   https://s-media-cache-ak0.pinimg.com/originals/29/04/34/290434956cdd220cc8d6e0b18948cf3c.jpg or this:  https://www.t-nation.com/img/photos/2013/13-775-04/Nordic-Start.jpg

Keeping your hips flat (straight line from knees through hips and shoulders) – you lower your body down slowly until you can no longer hold your weight then catch yourself in push-up position and push back up:  https://simplifaster.com/articles/wp-content/uploads/sites/5/2017/03/GHR.jpg .       You can also use a band during the exercise which provides progressively more assistance as you go lower towards floor to allow you to potentially perform the full range of the motion and come back up with the assistance of the band.    Then over time you gradually decrease the assistance of the band by user smaller and lighter bands.      This provides a good video of how you can do this by attaching a band overhead and behind you:  https://www.youtube.com/watch?v=LQm9rdzZlRk

There are also numerous machines designed for this exercise including:

Here is a 6 week progression:

Week                   Sessions/Week                  Sets                       Reps                     Rest
1                                           1                            2                            5                            2 min.
2                                           2                            3                            5                            2 min.
3                                           2                            3                            6                            2 min.
4                                           2                            3                            7                            2 min.
5                                           3                            3                            8                            2 min.
6                                           2                            3                            9                            2 min.


Sunday, July 16, 2017

What is the Best Way to Warm-Up?

There is a lot of controversy and conflicting opinions on what you should do for a warm-up for exercise.   One of the reasons is that warm-ups should vary based on the activity you are preparing for and your level of fitness.

As the name implies one of the key goals in warm-up is to literally raise the body temperature and gradually ramp up the cardiovascular system to be prepared for harder efforts.     The length of warm-up should be based on the intensity of the activity.     Low intensity activities like moderate pace walking really require no specific warm-up as you can simply ease into the activity itself as a warm-up.     For activities like competitive athletic events that involve high intensity effort the warm-up should be longer.

In the same way, you have to consider your fitness level because a warm-up for a highly fit individual may be relatively high intensity exercise for a deconditioned person.

For all warm-ups, a 1 – 5-minute period of escalating cardiovascular exercise that raises heart rate and body temperature is advisable.    For high intensity athletic events this should be extended until the athlete breaks a sweat without being fatigued.   

This literal warm-up can be done on a cardiovascular exercise machine or via dynamic bodyweight exercises like squats, lunges, planks, push-ups, etc.    

Once you raise body temperature you can include some dynamic stretching with an emphasis on movements that address key joints and muscles involved in the actual activity you are warming up for.   For example, for tennis warming up the shoulder joint and surrounding muscles is important while for cycling this is less relevant.

 A Proven Warm-up Protocol
Warm-ups for sports participation have been researched and there is one in particular protocol that is proven to reduce injuries by improving muscle strength, balance, and coordination.    This protocol is called the FIFA 11+ Program and involves doing 15 exercises.    For a complete how to guide click here:  https://www.slideshare.net/PedMenCoach/fifa-11-warmup-to-prevent-injuries 


Although this protocol was developed for soccer it can easily be modified to fit just about any competitive sport!

Monday, July 10, 2017

S-Drive/Crank Cycle Tabata Workout

The S-Drive and Crank Cycle can be used together for a fantastic HIIT Training Workout that is very simple to execute and appropriate for all ability levels!

For the S-Drive portion the exercise is sled pushes so take the belt system off and let it hang from the front of the S-Drive.   Use the sled resistance on the left side of the S-Drive to select and control resistance levels.    You can also use the parachute resistance on the right side to fine to the level of resistance.   

You will be doing a total of 8 sets of sled pushes for 20 seconds of work and 10 seconds of rest, and ideally you choose 4 different hand positions for two sets each at low to high levels so that you change the angle of load/push to create a complete lower body workout!
Sled push exercise video:  https://www.youtube.com/watch?v=wupkFtT69C0

For the upper body portion you will do 8 total sets of Crank Cycle all done standing as follows:
Single Arm Left Cranking – done standing in straddle stance with left leg forward and right leg back with right foot on ball of foot on sloped surface of rear portion of Crank Cycle.

Single Arm Right Cranking – reverse of above

Double Arm Forward Together – standing feet parallel

Left and right crank arms 180 offset – standing feet parallel

Then you flip the locking mechanism to turn the crank tower 180 and lock it down. 
    
Repeat all four of the above in the opposite direction.

For a tutorial on how to use the Crank Cycle see:  http://www.matrixlearningcenter.com/how-to-use-krankcycle/

Workout
Set up a timer for two rounds of Tabata – 20 seconds work and 10 seconds rest for 8 repetitions with a one minute break and repeat.

Start on s-drive doing a set of sled pushes

Then immediately go to Crank Cycle for set of single arm cranking as per above.

Repeat this cycle 4 times changing hand position for each set on S-Drive and changing exercise each set on Crank Cycle.

After 8 total intervals (4 on S-Drive and 4 on Crank Cycle) take a one-minute break.    During the break turn the Crank Cycle Tower 180 degrees as per above.

Repeat another 8 total intervals (4 on S-Drive and 4 on Crank Cycle).  


This workout will take 9 total minutes plus a 5-minute warm-up and cool-down for a total of 19 minutes!   You will not believe the results – perform 1 – 3 times per week with your best effort!

Sunday, July 2, 2017

Superman Shoulder Press with Flat, Circular Band

Flat circular bands are a simple, but amazing tool that provides a very different loading profile than free weights or machines.   One of the best exercises with a flat, circular band is the Superman Shoulder Press.   It provides loading that matches the shoulder’s strength curve in that the more the band is stretched the heavier the load.  During the shoulder press your leverage, and hence your ability to produce force, increases as you get closer and closer to extension.

To do the Superman Press step inside the band with feet shoulder width apart or wider.   The wider your feet the more the band will stretch and the “heavier” the load that will be produced during the press.   So you are literally standing with both feet on the band which then goes up around the feet (it is circular right?).   Then holding the band with both hands at the same time “clean” the band so you are in a position to press it overhead.   The band will go down from the outside of your hands then down to the feet and also across from one hand to another.    Notice that you can adjust your hand position in or out to make it more comfortable and your hands should be holding the band at shoulder level (top of chest).

Keeping the core muscles tight and engaged press the band up AND out as you extend the arms fully overhead.  By pressing out while you press up you create space in the shoulder capsule and prevent impingement.   Many people who feel pain with a dumbbell or bar overhead press find they can get all the benefits of an overhead pressing movement WITHOUT the pain because of this.

To make the exercise more metabolic add in the lower body by doing a squat from the starting position as you hold the band at your chest level and then do a press from the standing position – basically a band thruster providing a full body exercise that really jacks the heart rate.

The other advantage of the Superman Press is that with bands you can safely move at high speed during the concentric phases to work on power – but always pause at the top and lower slowly to get the other benefit of band training – a great eccentric load!

For a good video of the movement click here:   https://resistancebandtraining.com/exercises/shoulders/shoulder-press/

Sunday, June 25, 2017

What does "Grass-Fed" Meat Mean?

If you shop for the food in your family you have probably started to see the term “Grass-Fed” on more and more meat products.   You may have wondered what it means and what significance it has for human health.

To make it more confusing this term is often thrown in with other terms such as “Organic” and “Grass-Finished”.       To understand all this let’s start with talking about Grass as opposed to Grain Fed.     Cows and other Ruminants including cattle, goats, sheep, giraffes, deer, moose, and caribou to name a few have a natural diet based on what they have eaten for hundreds of thousands of years.     Their bodys' and specifically their digestive systems were shaped by evolution to eat green plants!

For thousands of years that is what they did eat, but in modern times cattle farmers learned that feeding a ruminant grains and corn will put weight on them much faster than their ancestral diet of green plants consistently mostly of grasses.      This translates to quicker time to slaughter, lower costs, and higher profits for the farmer!  Grain and corn is the metabolic equivalent of feeding cows a diet of “Twinkies” with all the consequences.      In addition, grain fed cows have a particular taste and Americans in particular have become used to it and partial to it.

Unfortunately, grain fed animals have a very different fatty acid composition than animals fed a grass diet.      Grass-fed cattle contain much higher levels of many beneficial compounds including anti-oxidants, Omega-3 Fatty Acids, Conjugated Linoleic Acid (CLA), Trans-Vaccenic Acid (TVA), Trace Minerals, and vitamins.      

The worst part is that most meat is not just grain fed it is injected with hormones and antibiotics that also speed up weight gain and the corn and grain is very low quality and heavily sprayed with pesticides so you’re eating tons of toxins when you consume meat raised this way!

Omega 3 Fatty Acids are essential fatty acids as our Omega 6 Fatty Acids meaning we must consume them and cannot manufacture them in our bodies.   We need both in a balance.     Unfortunately the American diet is way too high in Omega 6 fatty acids and this has big-time consequences to human health (see this previous blog post to understand the need for lower intake of Omega 6 Fatty Acids and Higher intake of Omega 3 Fatty Acids and how and where to get both - http://workoutanytime.blogspot.com/2016/11/omega-3-fatty-acids-and-health.html )

Anti-Oxidants are crucial for health and grass-fed meat has much higher levels of carotenoids like Beta-Carotene and others.    Carotenoids are fat-soluble meaning they tend to get stored in fats making the fat look yellow.      Yellow fat (like butter from grass-fed cows) is a sign of high nutrient density.    More carotenoids = more antioxidants and more nutrients (plus richer flavor!).  

CLA provides several key benefits including:

Improving weight loss and specifically reduces bodyfat! 
Helps increase lean mass including muscle and bone!
Potent Anti-Cancer Effects
Helps reverse atherosclerosis (hardening of arteries)
Improved digestions
Helps balance inflammation and immune function
Reduces food allergies and sensitivities.

TVA – aka Trans Vaccenic Acid is technically a trans-fatty acid, but unlike man-made transfats which are unquestionably NOT healthy – there are benefits to TVA.    Naturally occurring TVA in grass fed animal products may help lower cholesterol and LDL cholesterol in particular along with lowering triglycerides.  TVA can also be converted to CLA in your body.     Like CLA TVA seems to reduce risk factors associated with heart disease, diabetes, and obesity according to research from the University of Alberta.

Grass-Fed vs Grass Finished

Grass-Fed means that cattle ate nothing but grass and other forage (like hay or silage) for their entire lives.   This means they were never fed grain at any point. 

As the name implies Grass-Finished means the animal was fed grains but was “finished” eating grass before slaughter.    How much time eating grass vs grains and the quality of grains makes a BIG difference.      Just 90 days of grain feeding destroys all the benefits of grass feeding so knowing what the animal ate and for how long is key which is why you ideally buy beef from a farmer you know and trust!    

Alternatively buying meat that is organic AND grass-fed is by far the best option.     Just Organic means the grain fed to the animal was not sprayed with pesticides which is good, but this does not provide the many benefits of feeding the animal a grass diet as described above.

See next Month's Blog for a detailed explanation of the term "Organic" and how to interpret all those differrent lables such as "Certified Organic", "100% Organic", "All Natural", etc.